Installing Peel and Stick Wallpaper on Textured Walls
Some of the below links are affiliate links and if clicked, I may make a small commission at no cost to you. As an Amazon Associate I earn from qualifying purchases.
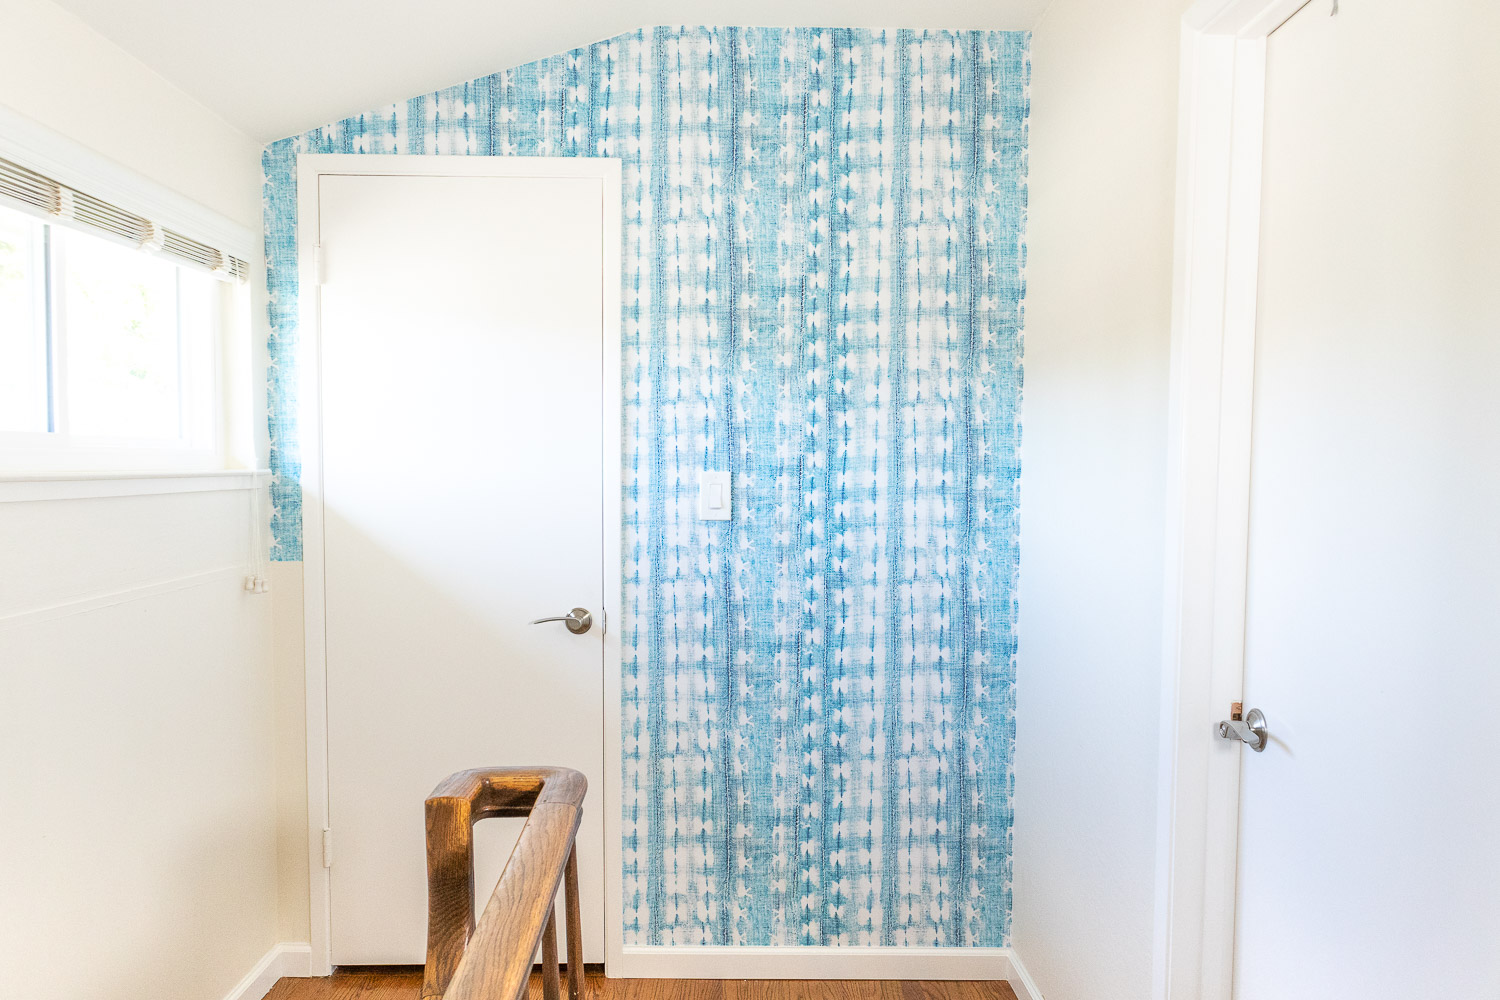
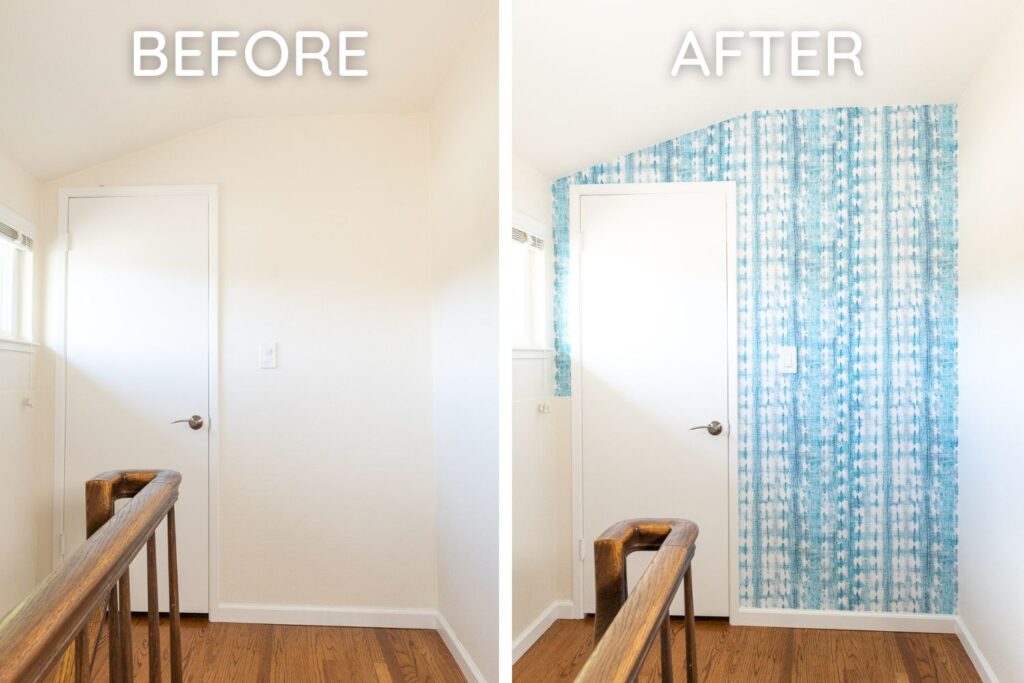
I’ve always wanted to try peel and stick wallpaper in our home! I like that it’s low commitment and that I could possibly take it down or swap it out if I got tired of the design. To start, I decided to do a small accent wall at the top of our staircase. I turned to Spoonflower because I knew they made high quality wallpaper and had thousands of designs to choose from.
Since peel and stick wallpaper material and application can vary from brand to brand, I highly suggest checking out the wallpaper website for any pointers before you purchase any wallpaper or begin the application process.
The below are my instructions using the Spoonflower Peel and Stick Removable Woven Wallpaper. This was my first time installing wallpaper of any kind, so there was a bit of a learning curve. While I roughly followed the instructions on Spoonflower’s website, I did deviate from them a bit – applying it to textured walls and trimming the paper down before applying (both not recommended). I weaved in my tips and experience with the instructions below so you can be prepared for your next project.
Materials
Peel & Stick Wallpaper – I used this Rustic Indigo design
Scraper (came with the wallpaper I ordered)
Masking tape (optional for testing layout)
Step stool
Pencil
Scissors
Step stool
Screwdriver (for removing light switch and outlet cover plates)
Watch my YouTube video to get a closer look!
I made a YouTube video of the entire process. You can watch the whole process here!
Can I Apply Peel and Stick Wallpaper to Textured Walls?
Most wallpaper manufacturers do NOT recommend applying their peel and stick wallpaper to textured walls. This is because peel and stick wallpaper is generally removable (not very sticky) and any texture can prevent the wallpaper from adhering properly. Whether your peel and stick wallpaper will stick and stay depends on a number of factors such as the strength of the adhesive, size of your wall, type of paint, type of wall texture, and room temperature.
Having a perfectly flat and smooth wall is IDEAL if you want the best results. Check out How to Prepare Walls for Peel and Stick Wallpaper next if you’re interested in modifying your existing wall texture.
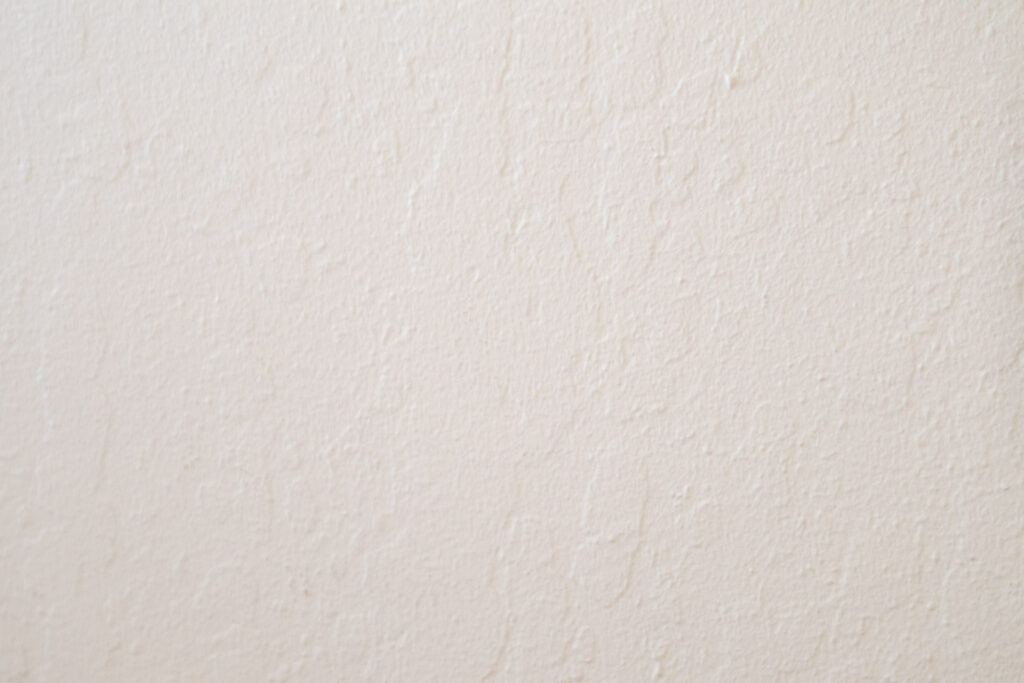
I chose not to modify my textured walls and was still able to get pretty good results with this simple hack! Your results might not be the same, so consider your options and proceed with caution. 🙂
Tip: I highly recommend ordering a sample and trying it on the wall you’ll be wallpapering BEFORE you place your order for the full amount. This way you can see how it holds up on your wall and if you like the design in your space.
How to Prepare Walls for Peel and Stick Wallpaper
Move furniture out of the way and remove anything hung on the walls. This includes cover plates for light switches and outlets.
Clean Walls – If your wall is already pretty smooth with minimal texture, use a damp rag to wipe off any dust. You’ll want to remove as much dust as possible to maximize the surface area your wallpaper can bond to.
If your wall is textured, consider the following options if you are okay modifying your walls:
- For heavily textured walls, consider applying a skim coat using joint compound.
- If your wall requires just a few small fixes, consider spackling the wall to cover up any imperfections.
- Note that joint compounds and spackling can have varying dry times, so please refer to the product packaging for application instructions. Once the joint compound or spackle has dried, sand the wall to a smooth finish with sandpaper and wipe off any dust.
- Alternatively, you can apply a wall liner. This will cover any imperfections on your walls and create a smooth surface for your wallpaper to adhere to.
Remember that I chose not to do any modifications to my wall since I wanted to preserve the original texture (shown below). This was definitely risky and I did run into problems. But in the end, I was able to fix it so I’m happy with my decision.
Please ensure your walls are completely dry and as dust-free as possible before proceeding!
Testing the Wallpaper Layout Before Installing
Since the wall I applied wallpaper to had a door and an uneven ceiling, my wallpaper order included two different lengths. I wanted to test the layout on my walls before applying, so we taped the sheets to the wall to get a better idea of where each sheet would go and whether the patterns would line up properly.
If your wall is perfectly rectangular and all your wallpaper sheets are the same length, you probably don’t need to do this. I would recommend at least laying all the rolls side by side on the floor to make sure you have enough to cover your walls. The last thing you want to do is start your project without having enough material to finish!

How to Apply Peel and Stick Wallpaper
Choose to start at either the left or right corner of the wall. I started at the right side since the highest point of wallpaper would be there.
Peel a few inches of the liner away from the top of the wallpaper and position the wallpaper in the corner making sure the top edge aligns with the ceiling and the right side aligns with the edge of the wall. Press this small section down first with your hands, then use the scraper tool to smooth out any bubbles.
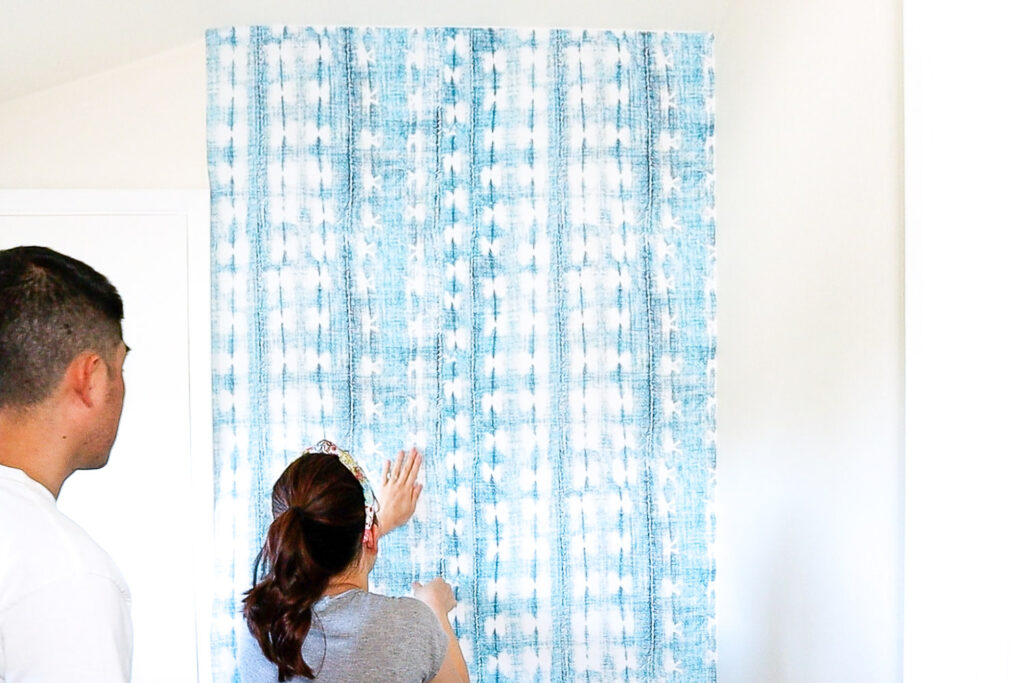
Tip: It helps to have a second person to hold the bottom portion of the wallpaper while you’re applying the top edge as the bulkiness and weight can make it a bit difficult to apply. Once the top edge is secured, the application process becomes much smoother.
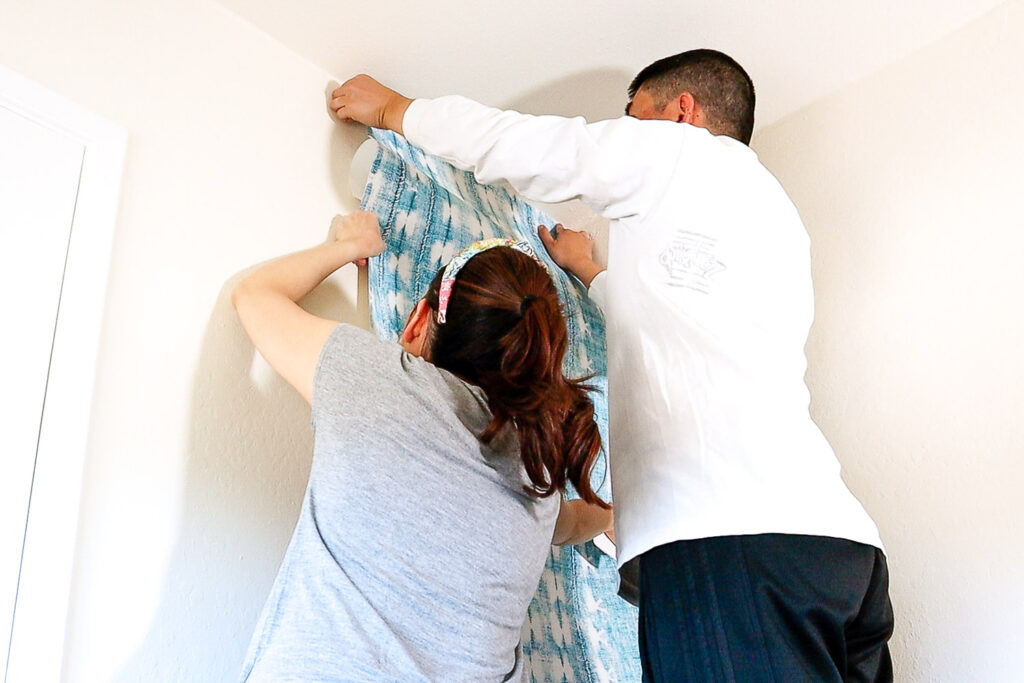
Work your way down the wall, rolling the liner back a few inches each time. Use the scraper tool in a downward motion to smooth out the wallpaper as you go.
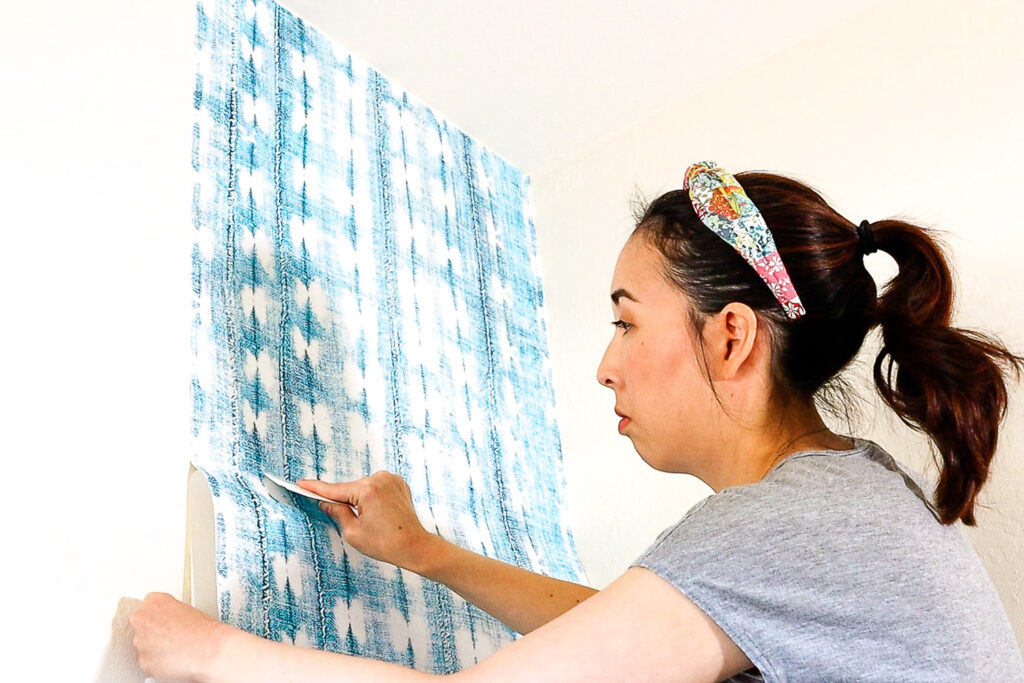
The Spoonflower website recommends against trimming the wallpaper prior to application, but I found it was so much easier to work with pieces closer to the size I needed. If you do go this route, test the sheet next to the previously applied sheet and double check that the pattern matches up first. Trim one section at a time, adding a few inches for wiggle room.
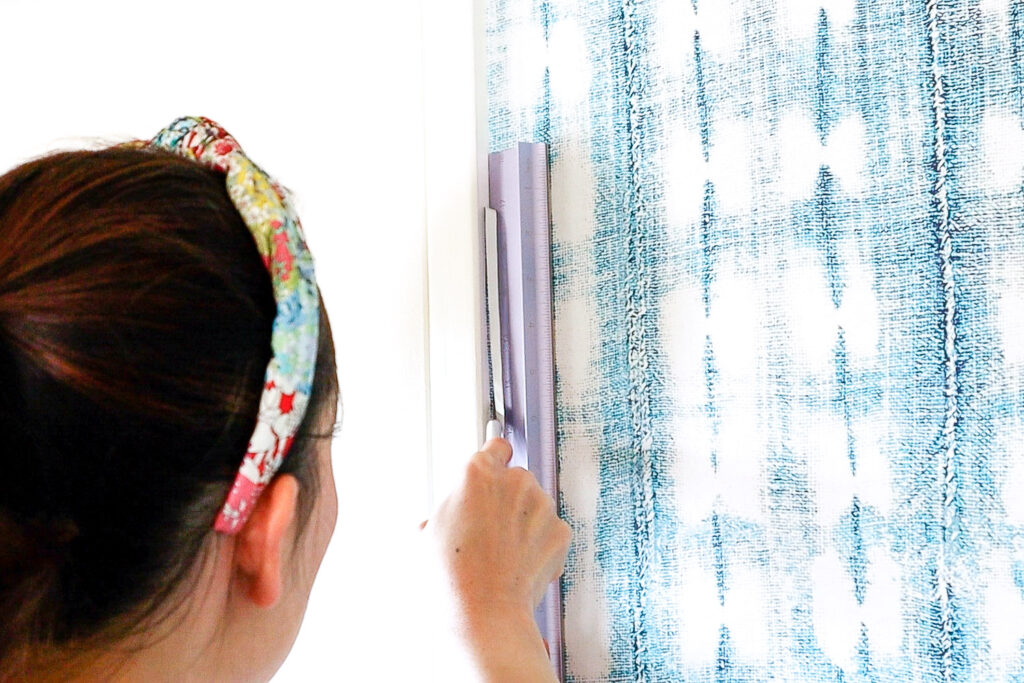
Once your wallpaper reaches the baseboards, rest a metal ruler right at the seam, starting at the edge of the paper. Hold the ruler in place while using the craft knife to trim off the excess paper. Then slide the ruler over to the uncut section, and repeat the process.
Tip: It helps to have a SHARP craft knife so the wallpaper can get cut in one go! This also helps to prevent any fraying.
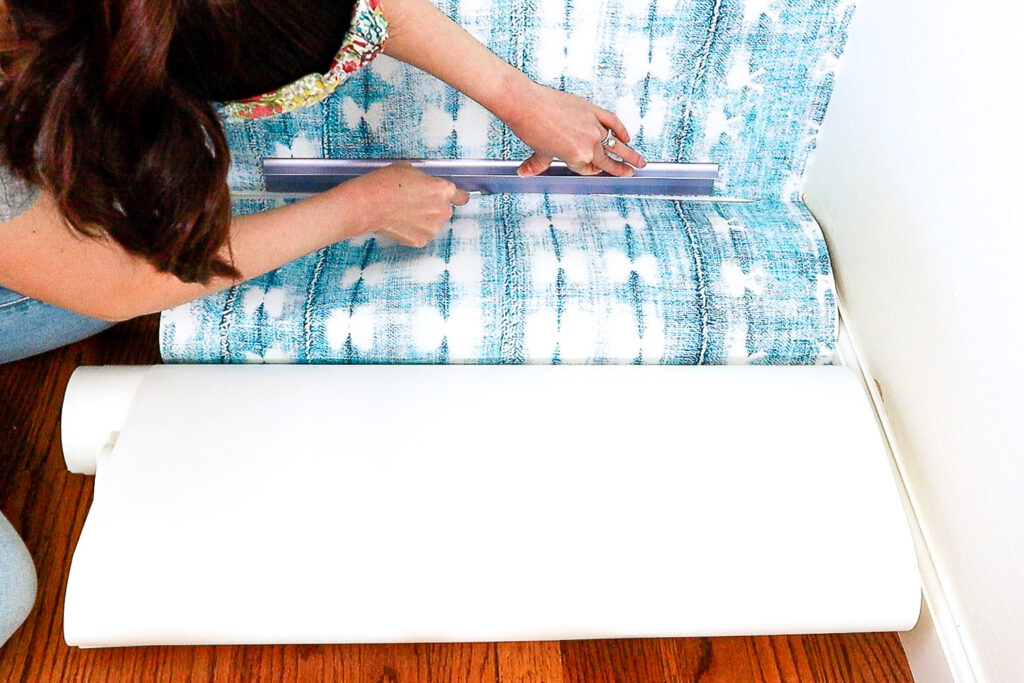
After all the excess paper has been removed, use the scraper again to smooth down any edges.
Start the second sheet in the same way, making sure to match the pattern adjacent to the first sheet. Note that the Spoonflower wallpaper includes a 0.5”-0.75” inch overlap on the right side so your second sheet will need to overlap the first sheet by this much. Keep moving down just like you did before, paying close attention to matching the pattern on the overlapping edge. Once you reach the baseboard, trim the wallpaper like you did before.
Tip: The scraper is your best friend! Use it constantly to smooth out any bubbles and press the wallpaper onto the wall.
How to Apply Wallpaper Around Light Switches and Outlets
Ideally you should turn off electricity before applying the wallpaper. If you haven’t already, remove any cover plates with a screwdriver.
Apply the wallpaper downward until you reach the light switch or outlet. Peel back more of the liner and let the wallpaper rest over the light switch or outlet. Hold the wallpaper down so it’s as flat as possible, then use a craft knife to cut around the light switch or outlet. Use the cover plate as a guide to ensure the cut area will be covered.
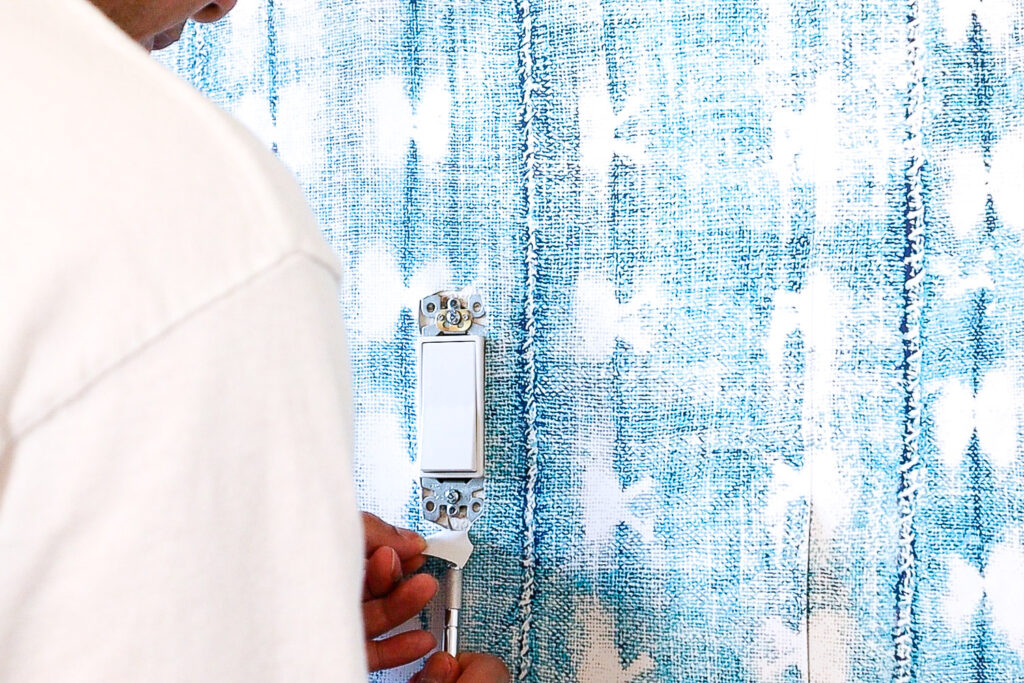
Once the light switch or outlet area is exposed, press the wallpaper around it and smooth any bubbles with the scraper. Continue applying the wallpaper down the wall until you reach the baseboard or floor.
How to Apply Wallpaper Around Door Frames
Apply the wallpaper downward until you reach the top of the door frame. Then trim the edge meeting the frame until you reach the corner. Proceed to apply the wallpaper all the way down the side of the door frame, then trim off the excess using a metal ruler and craft knife.
I did not have the opportunity to try this around windows, but I presume the technique would be very similar. Instead of applying the wallpaper all the way down the wall, stop at the bottom corner of the window frame. Then work the wallpaper inwards below the window. Trim off the excess wallpaper covering the window frame before proceeding to wallpaper down the wall.
How to Apply Wallpaper Near Slanted Ceilings
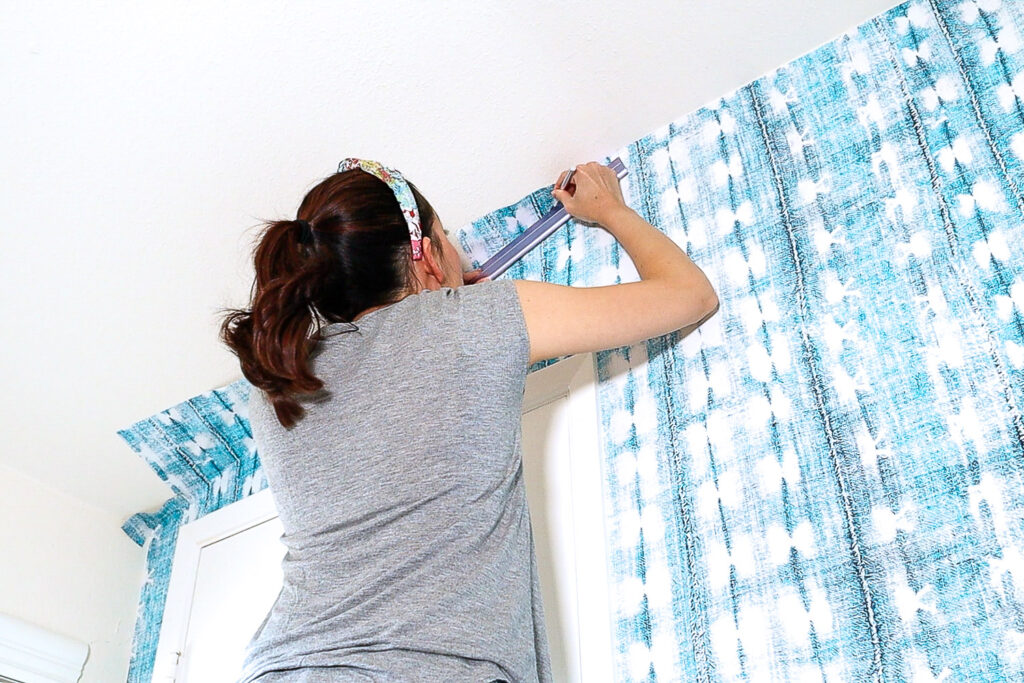
Applying wallpaper to slanted ceilings can be a little tricky because you’re not starting with a straight top edge. Because my ceiling was slanted above the door frame I decided to cut the wallpaper down to size (plus a few inches). If you decide to do this, test it first. Place the sheet on the area you’re covering, making sure the pattern will line up properly before cutting.
Peel back the liner and apply the top portion, matching the pattern with the previous sheet. This time there will be excess wallpaper on the top where your ceiling is slanted. Press that excess wallpaper onto the ceiling temporarily. Keep wallpapering down the entire wall or until you reach a door or window frame. Once you wallpaper the entire wall below the slanted ceiling, then go in and trim off all the excess that is stuck to the ceiling. It’s better to make this cut all at once so you don’t end up with an uneven wallpaper line.
How to Fix Peel and Stick Wallpaper That’s Falling Down
A few weeks after having the wallpaper up, the top of the wallpaper fell away from the wall! It was an especially hot day that day so I think heat definitely played a role. My husband helped me reinstall the wallpaper (it was not too bad since most of it was still attached to the wall), then came up with a solution to prevent it from happening again. We tacked down the top edge of the wallpaper with several small flat head nails we had on hand.
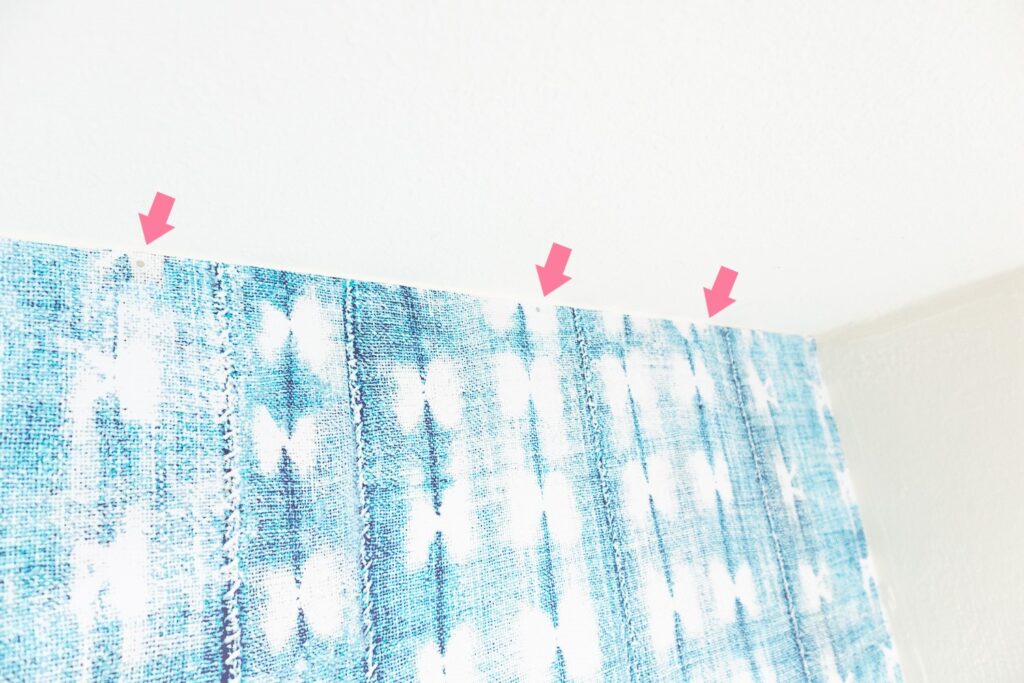
At some point I may paint them to match the wallpaper, but it’s hardly noticeable unless you’re up close. This trick has worked really well so far! I would recommend trying it if you’re having this problem too. I realize this is still sort of “modifying” the walls, but the footprint is still much smaller (and much less effort) than applying joint compound, sanding, etc. Overall, I’m happy with my choice and would do it again!
Final Look!
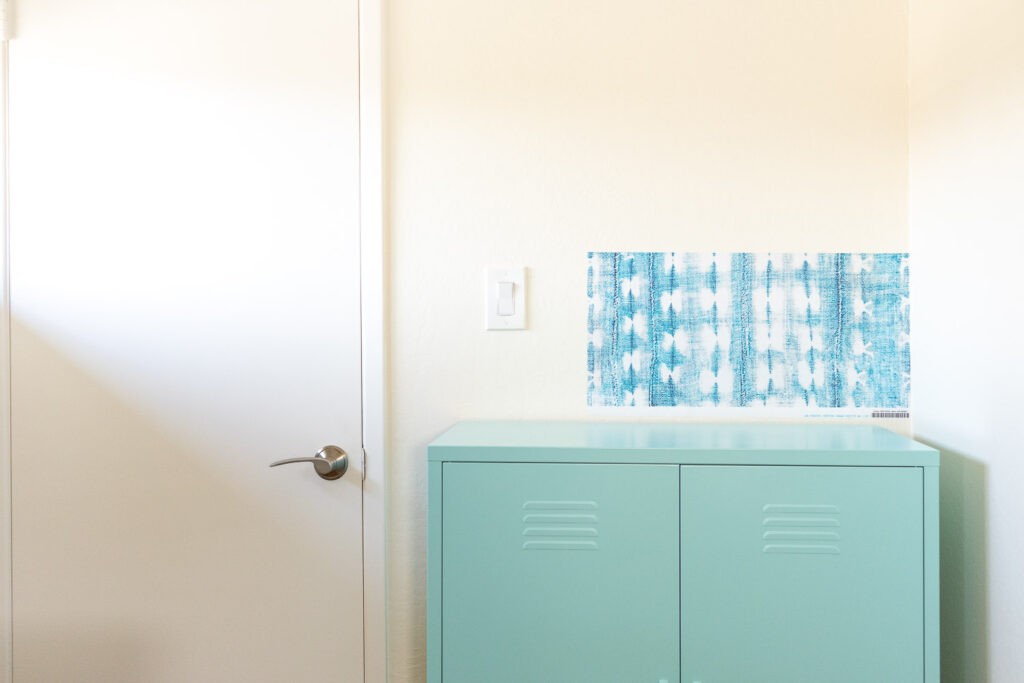
I absolutely love the pop of color this peel and stick wallpaper added to this previously bland space! I can’t wait to add some décor pieces to make this space feel even more special. So far I’ve purchased this cute locker and plan to organize my filming equipment inside. I’m also considering hanging artwork or something woven on this wall. There are so many options! What do you think would look good?
Save this Pin!

Have you tried peel and stick wallpaper yet? Would you try it on a wall in your home? If you do, make sure to tag me on Instagram. I would love to see the transformation!
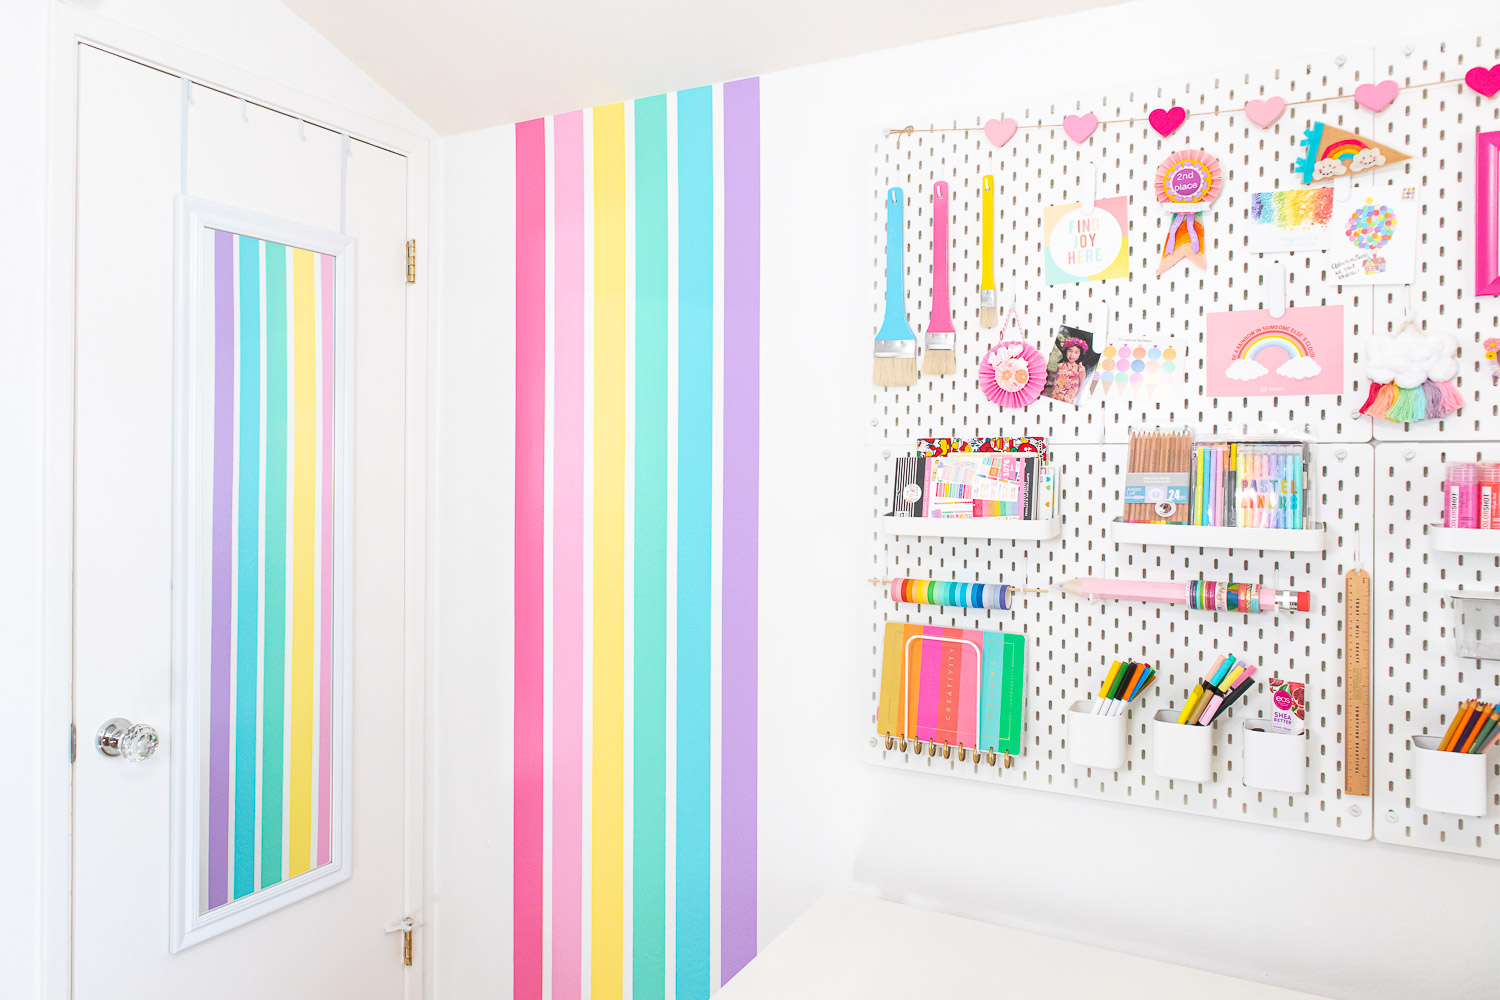
If you’re looking for another statement wall idea and love color, check out my Rainbow Stripe Wall tutorial.
Head back to my blog for more colorful DIY ideas and inspiration!
Blaire
Surprisingly well! The tacking trick really seemed to work. Have you tried peel and stick wallpaper in your home?
JoJo Woll
I think you & your hubby did an amazing job on your wall with this beautiful wallpaper. I would use that particular paper in my home as well, but have a fear of peel & stick wallpaper. I tried it once & it didn’t go so well. However, after seeing you guys do it, plus your helpful tips, maybe I’ll give it another go sometime. Thanks for sharing this Blair. Great job!