How to Make Jar Covers and Labels with your Cricut
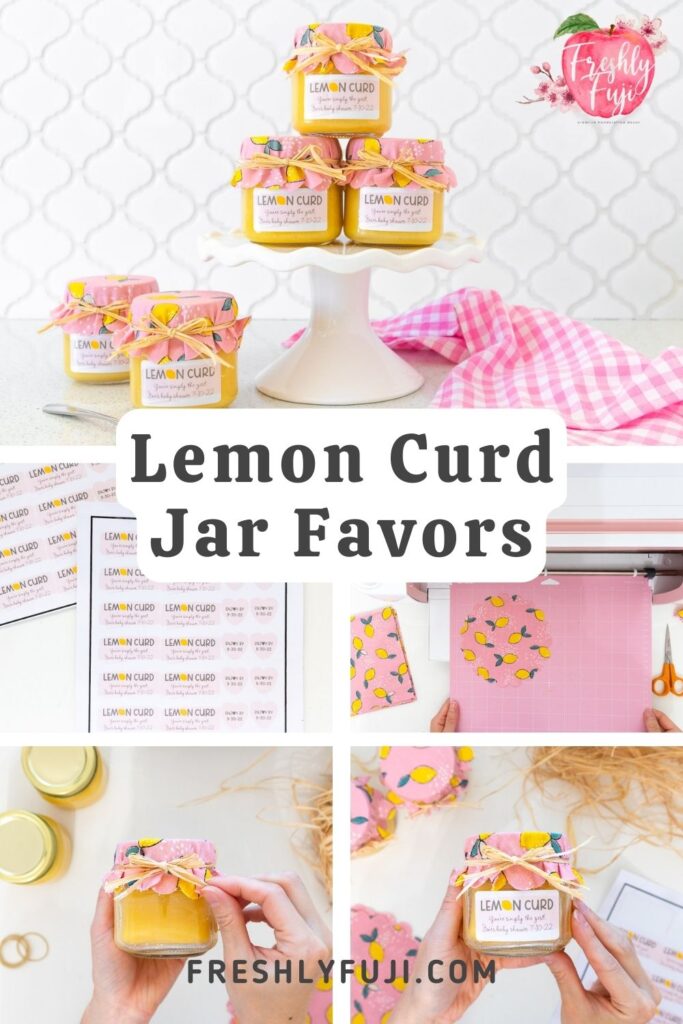
Making custom favors with the help of my Cricut is one of my favorite things to do when hosting a celebration. Me and my friend Jenna from Heart and Arrow Weddings planned a lemon-themed baby shower for our expecting friend Joie. Naturally we needed to squeeze lemons (pun intended!) into the party favors too, so we decided on lemon curd jars! We easily could have bought jars of lemon curd and relabeled them with cute labels we found on Etsy, but we’re hard core DIY gals (we can’t stop, we won’t stop!) so we decided to make everything – the lemon curd, the jar covers, and the custom labels!

Some of the below links are affiliate links and if clicked, I may make a small commission at no cost to you. As an Amazon Associate I earn from qualifying purchases.
We found this lemon curd recipe and spent one afternoon whipping it up together. Neither of us had made lemon curd before so we were both surprised by the large number of eggs and amount of lemon zest we needed (a good reminder to double check the recipe and your pantry before starting!). Luckily Jenna had picked some fresh lemons from her mother’s tree a week prior so we had lots of lemons to go around. Jenna’s canning set really came in handy for the canning process too. We ended up making two and a half batches of the recipe, producing 12 half pint jars of lemon curd.
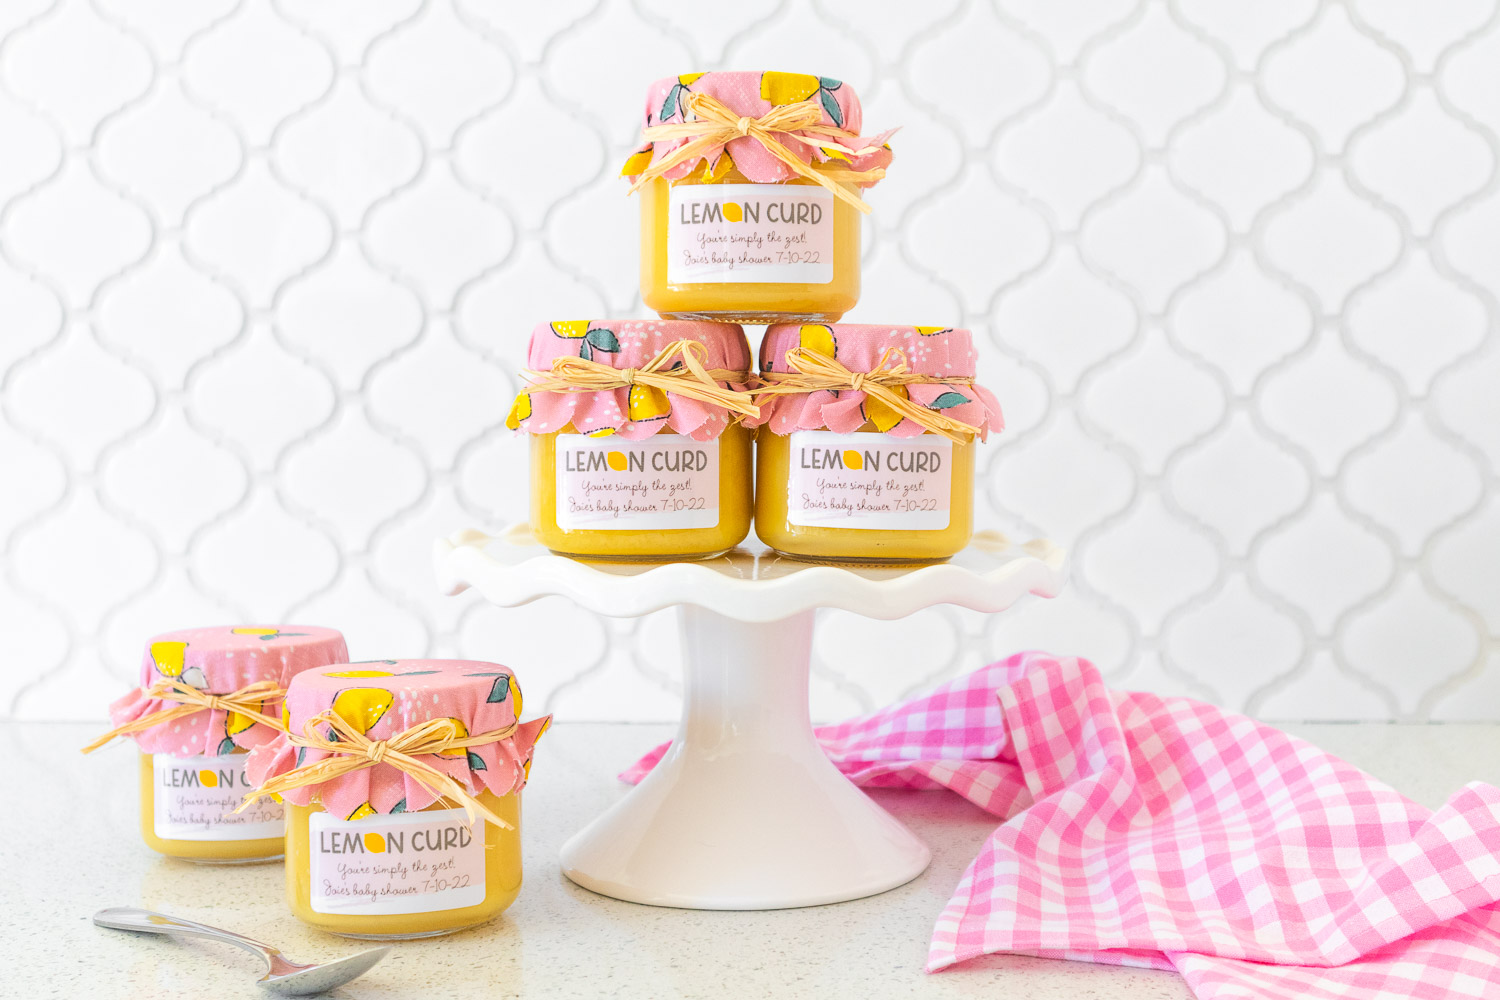
Once the lemon curd jars were cooled I dressed them up with scalloped jar covers and custom labels I designed. I couldn’t resist using a silly lemon pun and this adorable pink lemon fabric I spotted in the store! At the shower, our guests commented on how cute they were and one of them even popped open the jar for a taste test. Spoiler alert: The lemon curd was SO DELICIOUS!!
I’m sharing this whole project for FREE in Cricut Design Space so you can make something similar for your next event!
A few notes before starting
This project was designed specifically for lemon curd for a baby girl shower, but can be customized to meet your needs in so many ways! Here are a few ideas:
- Change the text to match the jar’s contents (eg. jam, jellies), guest of honor, and occasion
- Change the font, color, or size of text
- Resize the jar covers to fit your jars
- Use a different fabric type or print to match your event theme
- Swap out the raffia tie for bakers twine, ribbon, yarn, etc.
Save this Pin!
Materials
Supplies
Cotton fabric – this is the exact lemon print fabric I used
Rubber bands
Clear laminating sheets (Highly recommended to make labels water-resistant)
Tools
Cricut Maker (Labels can be made with the Explore or Maker series, but jar covers need to be made with the Maker or Maker 3)
FabricGrip mat (I used the 12” x 12” mat but you can consider the 12” x 24” if you’ll be making a lot of favors)
Ruler
Scissors
How to Make Jar Labels
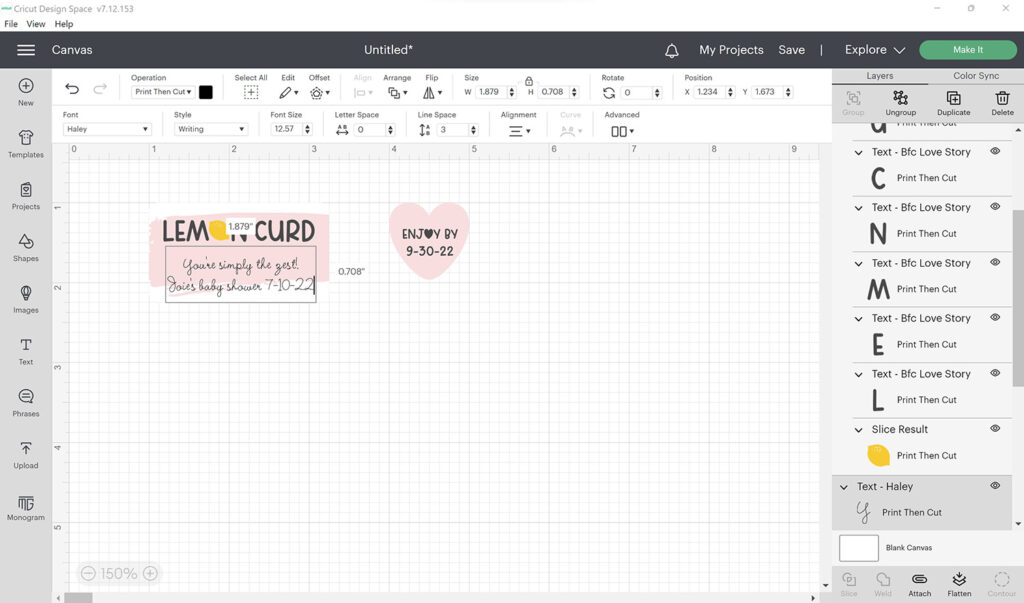
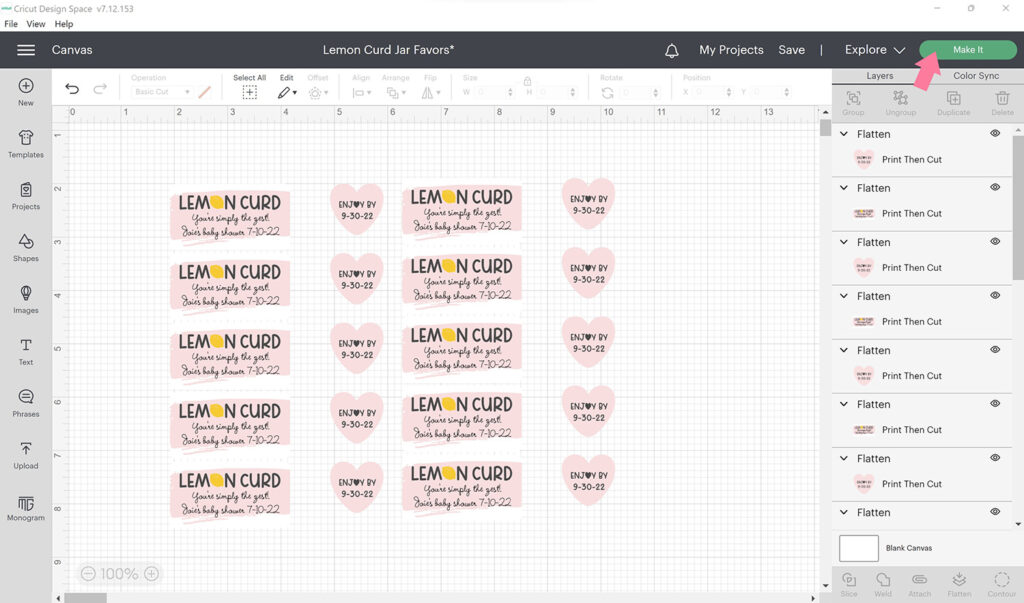
1. Open my design in Cricut Design Space
You will notice that there is a rectangular label and a heart label for the expiration date. There is also one scalloped circle for the fabric jar covers. Click the eyeball icon next to the scalloped circle in the Layers panel to hide it for now.
2. Edit the label
For the rectangular label, click on the text below “Lemon Curd” and edit the name, occasion, and date accordingly. For the heart expiration date label, edit the date (I used 3 months from the date we made the lemon curd). You can also change the font and text colors and even the shape colors (if you don’t want pink) at this time. Reposition the text as necessary.
Tip: The Align function can be helpful to center text on their corresponding shapes.
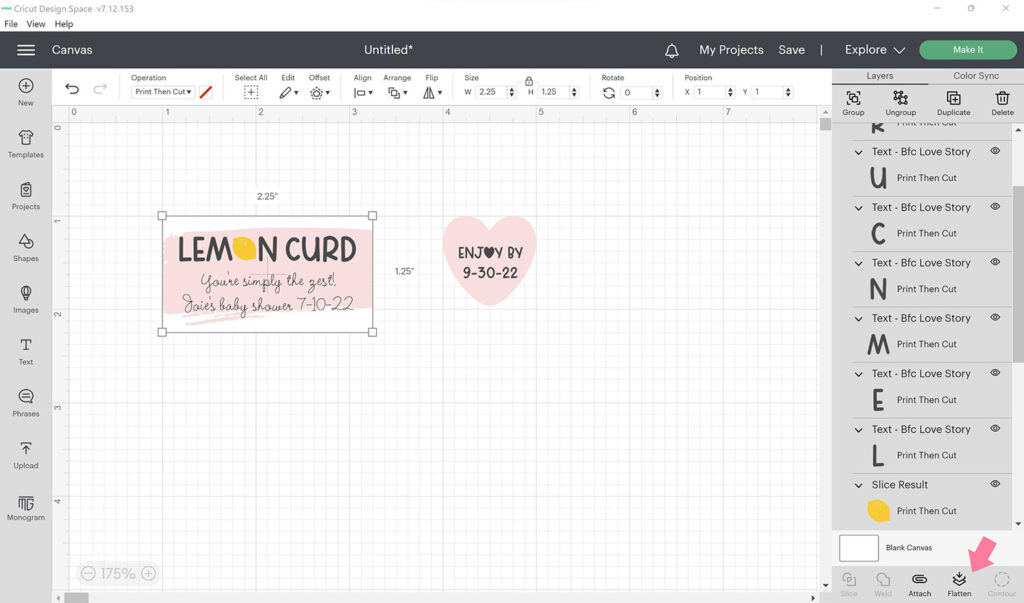
3. Flatten the label components
Select all the components of the rectangular label, then click Flatten in the bottom right corner. This converts all of the layers into a single-layered image in preparation for the Print Then Cut feature. Repeat this process for the heart expiration label.
4. Duplicate the labels
Next, create as many labels as you need for your favors. Do this by highlighting and copying (Ctrl + C for PC or Command + C for Mac) both labels, then pasting (Ctrl + V for PC for Command + V for Mac). Repeat as many times as you need to. Tip: Always make a few extras to allow for mistakes. You can reposition the labels if it helps you keep track of them, but this will not affect where they will be printed.
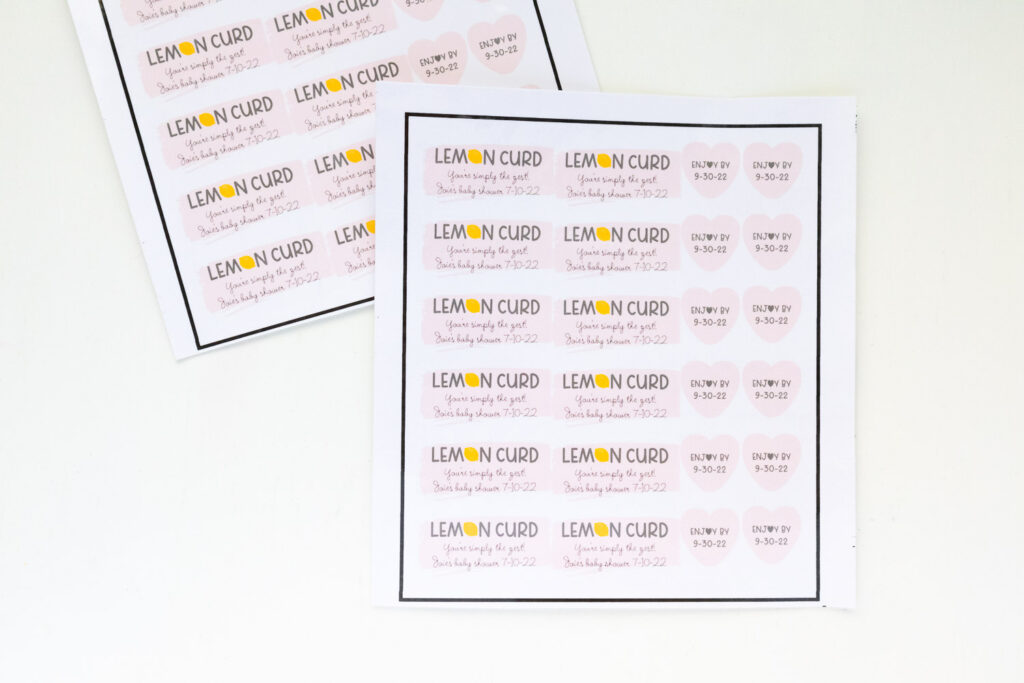
5. Print the labels on printable vinyl
Turn on your Cricut machine and allow it to connect to Design Space. Click the green Send to Printer button. This will open up a Print setup window. Turn on bleed, load your printable vinyl in your printer, then click the green Print button. Your labels should print with a black registration box around them.
Tip: If you find that your printer is pulling up paper in addition to your printable vinyl sheet, it could be because the backing is slippery. To resolve this, I adhered a sheet of printer paper to the vinyl backing using a few pieces of double sided tape.
6. Apply clear laminating sheet onto the printable vinyl
Once your printable vinyl sheet has been printed, allow the ink to dry before applying the clear laminating sheet. For best results, start by peeling back the top edge of the laminating sheet liner then placing it sticky side down near the top edge of the printable vinyl. Place a ruler along this top section then hold it down firmly as you peel back more of the liner and press the laminating sheet onto the printable vinyl sheet. This should help eliminate any bubbles. This does take a little practice, so be patient with yourself and remember you can always try again! Trim off the excess laminating sheet before proceeding.
7. Cut labels
Place the laminated vinyl sheet onto a standard grip mat, using a brayer to smooth out any bubbles. Load the mat and fine point blade into your machine then select Printable Vinyl as your material. Change the pressure to More since you have an additional layer. Press the Cricut Go button to begin your cut. Your Cricut machine will “read” the black registration marks to help cut the labels precisely.
Tip: Before unloading the mat, lift up part of a label to check if it got cut through all the way. If not, repeat the cut by pressing the Go button again.
Once the labels have been cut through cleanly, unload the mat by pressing the flashing arrow button. Then carefully peel the laminated vinyl sheet off the cutting mat.
How to Make Fabric Jar Covers
1. Prepare and edit design
Once you have finished making the labels, cancel the cut to go back to the Design Space canvas. Hide all of the labels by clicking the eyeball icons in the Layers panel. Alternatively you can highlight all of the labels and group them before hiding them to save time.
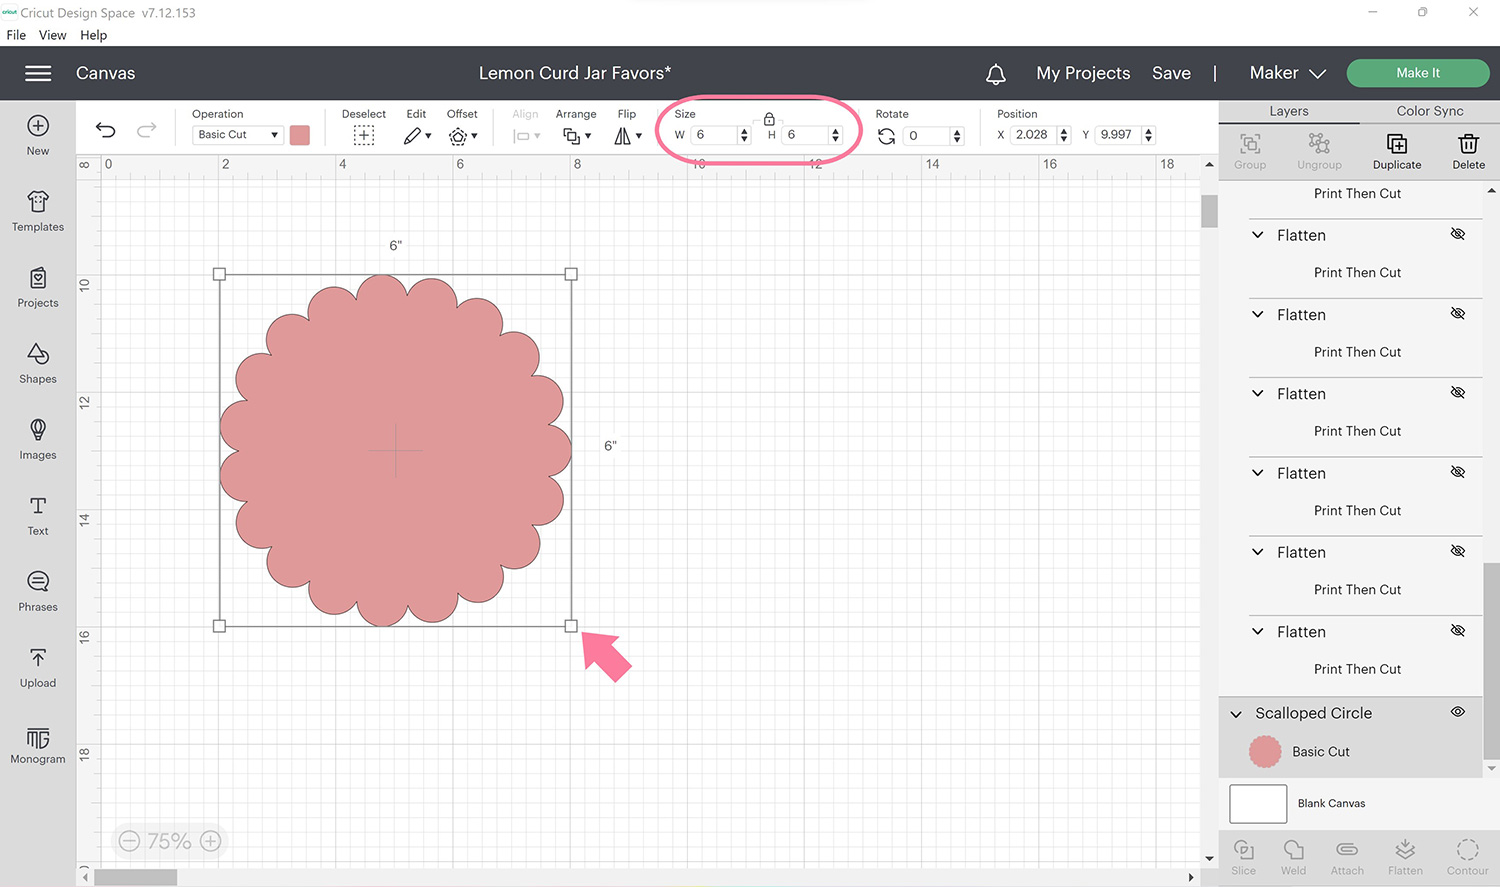
Decide on the size of the scalloped circles you’ll need. I found 6 inch circles to be the perfect size for the half-pint mason jars I used. To resize the circle, select it then drag a corner outward to the desired size or change the dimensions at the top menu bar.
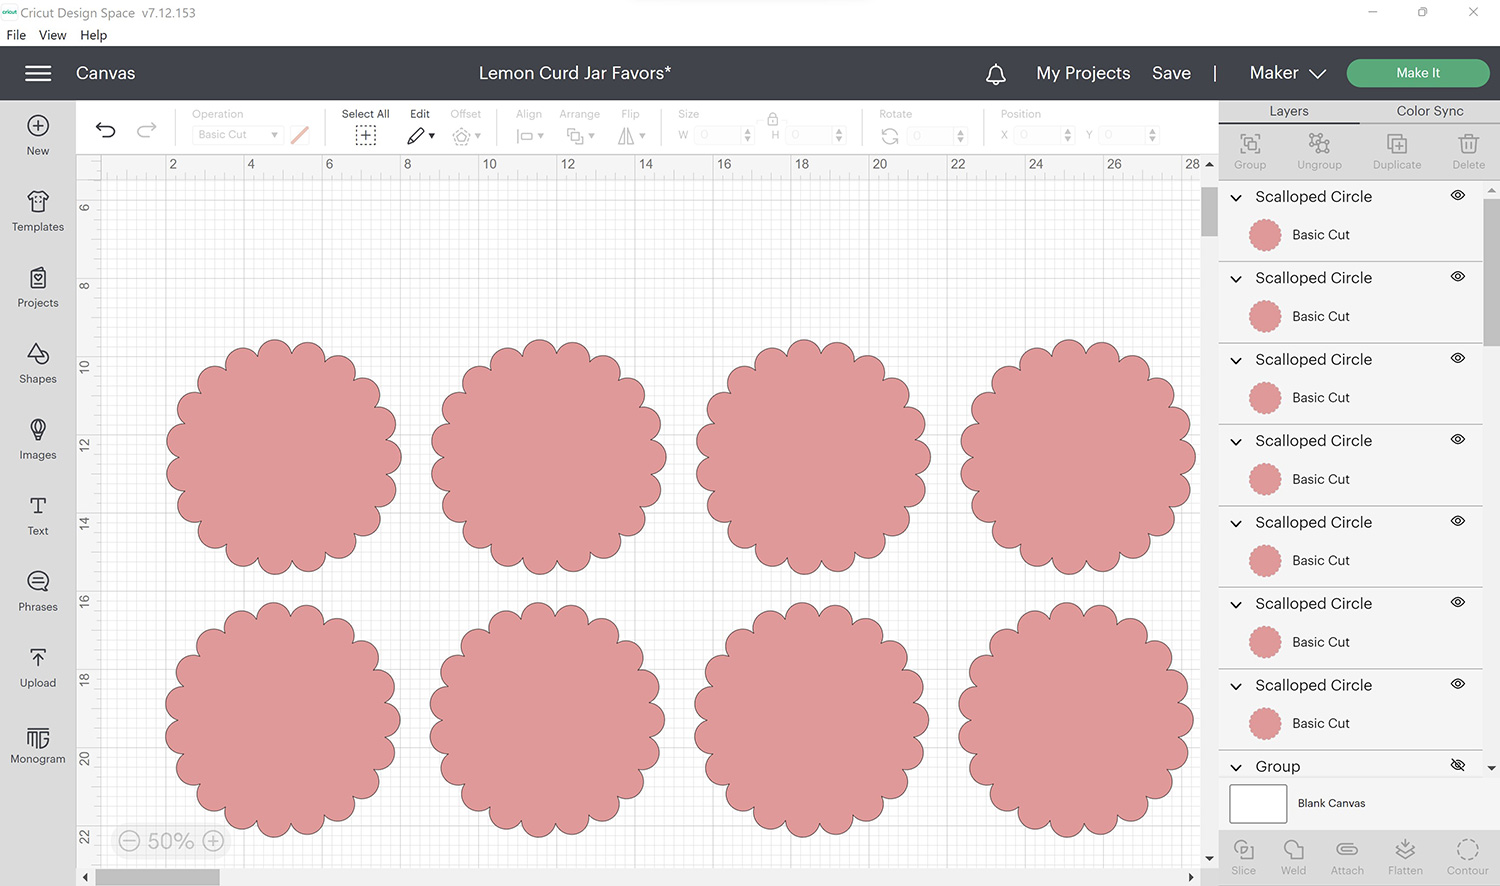
Next, create as many circles as you need for your favors. Do this by highlighting and copying (Ctrl + C for PC or Command + C for Mac) the circle, then pasting (Ctrl + V for PC for Command + V for Mac). Repeat as many times as you need to.
2. Prepare fabric for cutting mat
Iron out any wrinkles from the fabric you’ll be using. Cut out squares of fabric larger than the circles you’ll be cutting out. You can do this using a quilting ruler and rotary cutter or with a pair of scissors. I cut out 6.5 inch squares for my 6 inch circles. I could have also cut out 12 inch squares of fabric but realized the first method would result in less fabric waste. If the circles you make are smaller than mine, you may be able to place several on a single mat and cut out a larger square of fabric. If you’ll be making a lot of favors, consider using a 12” x 24” mat and cutting a larger piece of fabric for efficiency.

3. Cut out fabric scalloped circles
Click the Make It button and allow your machine to connect to Design Space. Before you hit Continue, you can move the position of the circle on the mat. You can also move the circle to another mat by clicking on the three dots in the top left corner.

Once you have made your adjustments, select Cotton as the base material and load the rotary blade. Place the fabric square you cut onto the FabricGrip mat using the screen preview as a guide. Roll over the square with a brayer to make sure it’s completely adhered to the mat. Load the mat into your machine with the flashing arrow button then press Go to start the cutting process.
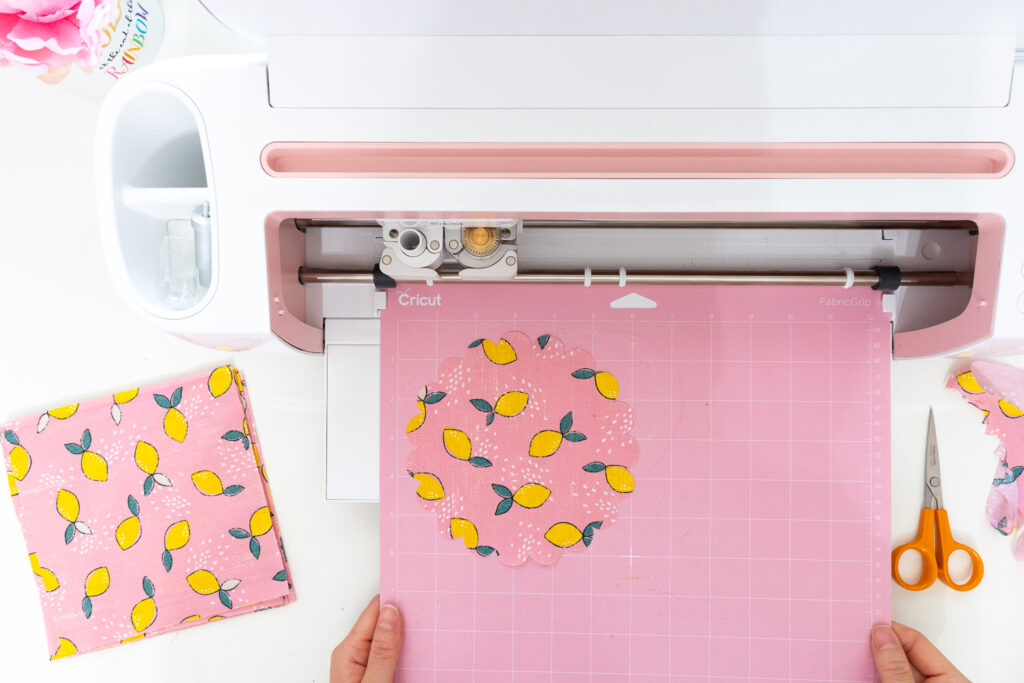
Tip: Before unloading the mat, lift up part of a circle to check if it got cut through all the way. If not, repeat the cut by pressing the Go button again.
Once the circles have been cut through cleanly, unload the mat by pressing the flashing arrow button. Then carefully peel the fabric circle off the cutting mat.
Repeat this process for the rest of the circles you need to cut.
How to Assemble Lemon Curd Jar Favors
1. Attach scalloped fabric circle to the lemon curd jars
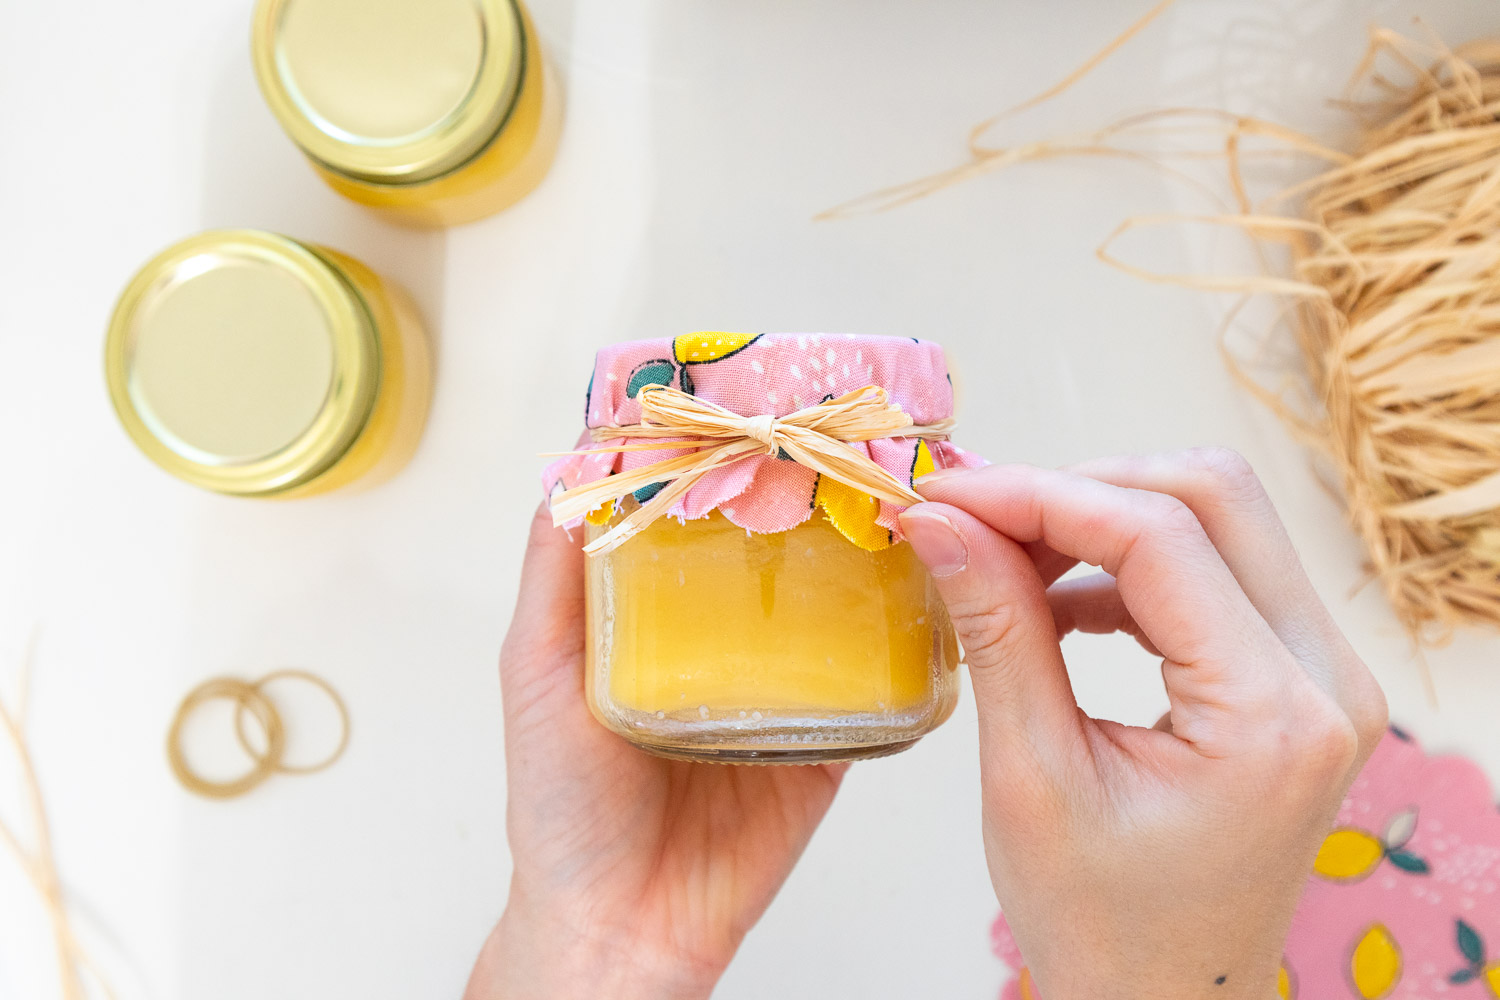
Place the lemon curd jar on the table with the lid up. Center the scalloped fabric circle over the lid and use a rubber band to secure it to the neck of the jar. Adjust the fabric so it’s gathered evenly. Then wrap several strands of raffia around the rubber banded area and tie them into a bow. Trim off excess raffia.

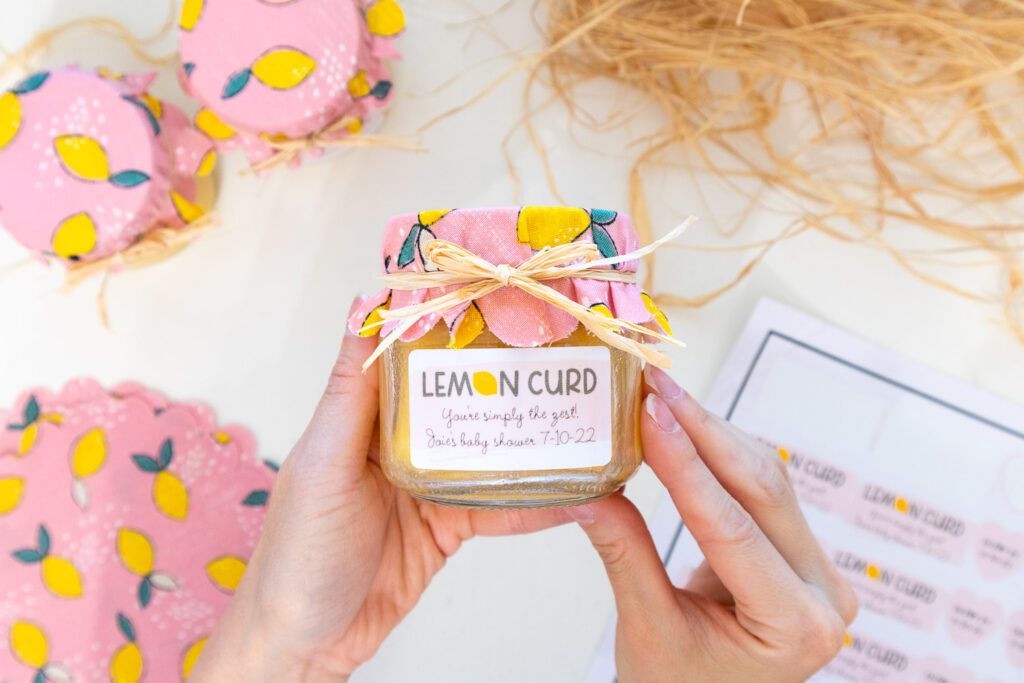
2. Attach labels to the lemon curd jars
Position the rectangular label on the front of the jar and press firmly. Use the first jar for reference when applying the remaining labels so the jars will look uniform. Place a heart expiration date label on the bottom of each jar.
Easy peasy lemon squeezy!
Your customized lemon curd jars are complete and ready to impress your guests! I just loved how this project turned out. I can’t wait to share photos from the baby shower in a future post. If you end up making this project, tag me in your photos on Instagram. I would love to see and share your creations with my craft-loving community. Happy crafting friends!
If you’re interested in other FREE projects I designed for Cricut Design Space, check out my Free Stuff Library.
Head back to my blog for more color craft ideas and inspiration!